By Christy Bassett, NOFA/Mass Communications Director and Homesteader at Barefoot All Natural Farm
Nothing signals spring quite like the chirps of baby chicks. As soon as the year turns the corner into March, with warmer weather in sight, my mind moves to preparing for new life and renewed food production on our small farm.
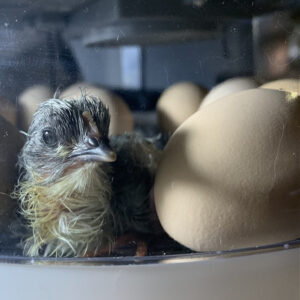
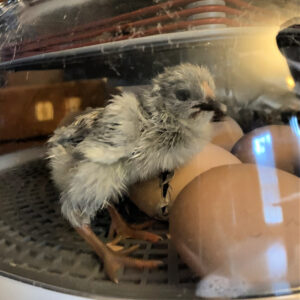
A Lavender Orpington chick newly hatched in an incubator
We keep a small flock of about 12 laying hens in our backyard to produce eggs for our family. Over the past 15 or so years, we’ve tried many different breeds, each with their own virtues. But through experience, we’ve narrowed our criteria for the breeds we keep to match our goals and circumstances.
- Dual purpose. We like to raise heavier dual-purpose chickens, so that individuals that aren’t kept for producing eggs (namely, all male offspring) can be used for meat with a decent carcass yield.
- Cold-hardiness. Our winters are cold and fairly long in Massachusetts. We’ve learned to select breeds that have full feathering, short combs, and aren’t overly affected by the cold in general.
- Temperament. Our kids help to care for the chickens and collect eggs each day, so it’s important to us to have calm, friendly birds.
Through these criteria, we’ve narrowed our list of favorites to Orpington, Sussex, Cochin and Wyandotte. We’ve found that these breeds do well in all of the categories above, and keeping a mix of them in our backyard flock provides a beautiful variety of colors and feather patterns.
A mixed flock can have its drawbacks though, especially if you’re looking to produce your own replacement chicks. Any time you cross-breed animals, you end up with progeny that don’t necessarily breed true to the parent generation. This means that you could (and likely will) have a range of individuals that vary in size, color, and characteristics. But if you’re not too picky, and start with breeds that are well-rounded in categories that you care about, barnyard mixes can be just as productive and fun to raise as purebreds.
Since laying hens typically only lay eggs consistently for about two years before their feed costs start to overtake their egg output value, most homesteaders bring in new layers at least every other year.
When it comes time for succession planning for your flock, you have a few options. One is to purchase started pullets or mature laying hens from a nearby farm or poultry breeder. While this option will get you in eggs faster, it can be more expensive (and you miss out on the cute fluff ball stage of raising baby chicks!) Another option is to purchase day old chicks locally, or from a hatchery that ships through the mail. This is a good fallback option if you can’t source the type of chicks that you’d like locally, but I imagine that the travel associated with hatchery chicks is stressful for them, and we always seem to have a few that perish in transit or shortly after arrival.
In my opinion, the best (most self-sufficient) way to replenish your flock is to hatch them yourself. If you’re still with me, and you choose to go this route, you have even more choices ahead of you yet.
Let the chickens do the work
If you have adult hens, there is a chance that at least one of them will “go broody” at some point throughout the year. “Going broody” means that the hen has the urge to set on a clutch of eggs and ultimately, hatch them out. Broodiness is great if you’re looking for more chickens. But since broody hens stop laying eggs while they’re setting on a clutch, it’s not so great if you’re looking for consistent egg production. Because many modern domestic breeds of poultry have been selectively bred for traits other than mothering ability (like maximum egg production), many no longer instinctively brood. However, some breeds have retained stronger natural instincts, including several of the breeds I mentioned above. Cochin, Orpington and Sussex chickens (as well as several other breeds) all have strong tendencies to become broody, so they are good choices if you are hoping for natural reproduction of your flock.
Allowing a hen to set on, hatch out, and raise a clutch of chicks is by far the easiest option for us human caretakers. (Of course, this also requires that you have a rooster in with your hens to fertilize the eggs, or you are able to source fertile eggs to place under a broody hen for incubation. See the “Sourcing hatching eggs” section below for more information.)
In this scenario, the mother hen keeps the eggs at the proper temperature and humidity, rotates them obsessively for three weeks, and protects them from potential dangers (within reason) before and after they hatch. This requires no special equipment, no electricity, and no close supervision. A total win if it goes smoothly!
The downside to waiting for a hen to become broody on her own is that you have little to no control over when she decides the time is right. Be it spring, summer, or even late fall, by the time the eggs hatch you may not be prepared to offer the proper housing or feed to young chicks. There is also no guarantee that the broody hen will be committed enough to complete the 21-day cycle of setting, rotating and protecting the eggs, leaving the potential for under-developed or non-viable chicks.
As harsh as it may seem, other flock members also pose a significant risk to new chicks. Chickens are opportunistic omnivores, and will eat small animals if given the chance. Some are even great mousers, catching and eating rodents that sneak in to steal feed. This tendency to kill and eat small animals means that adult hens are also prone to go after small chicks if they are not separated until they reach adolescence. If you are thinking that the mother hen will protect her chicks from other flock members, you may be surprised, especially if you have selected hens for docile, friendly temperaments. I’ve made the mistake of taking a chance on leaving a hen with newborn chicks with the open flock, and I’ll tell you that it’s devastating when your amenable mother hen, who has devoted three weeks to hatching a batch of chicks, loses them all within hours of entering the world. Don’t make my mistake, always separate and protect a broody hen and eggs from the primary coop. (Although this is easier said than done...broody hens don’t usually like to change their nesting spot once it has been chosen and are known to snap out of the broody spell if disturbed, abandoning the eggs and new nest site altogether.)
If counting on a broody hen seems like too much of a gamble for you, there is another option; using an incubator.
Using an incubator
Incubators come in all shapes and sizes, fitting all budgets. You can even skip the incubator and hatch eggs in an insulated cooler if you’re up for monitoring the temperature, humidity and turning of the eggs every day for three weeks. But more or less, the more automatic the unit, the better the hatch rate will be. We have this one and have been extremely impressed with the accuracy of the temperature and humidity settings and have had a nice reliable hatch rate with minimal oversight.
The incubator should be set to keep the temperature of 99.5 degrees F at all times. Raising or lowering the temperature more than a few degrees for more than an hour or so can terminate life in the egg, so you do need to keep an eye on it to make sure that the power cord doesn’t get bumped or catch if the cover isn’t replaced properly. Likewise, the humidity should be kept at about 55% throughout the incubation period, and then raised to 65-70% in the last few days before hatch. This is to keep the egg shell and internal membrane from drying out too much.
We had a problem with our old incubator not maintaining the humidity well, and found that fully developed chicks could not escape the egg and/or membrane when it came time because it was too hard and there was not enough lubrication inside for them to maneuver. We even found one egg with the shell completely flaked off, but the chick was still stuck in the membrane and passed. Less than ideal conditions can cause heartbreaking results, which is why It’s worth investing in a reliable model and following the instructions closely.
The last feature of the incubator is to automatically turn the eggs on a regular schedule. Naturally, the mother hen would fuss with her eggs and rearrange them on the nest, turning them in the process. Originally, it was thought that turning the eggs kept the embryos from sticking to one side of the membrane or developing in an odd position. But recently it has been discovered that turning actually stimulates the formation of extra–embryonic tissues and fluid, which are essential for proper growth and development. In the final days of incubation (day 18 for chicks), you should stop the egg turner, if your incubator doesn’t turn off automatically. This is the time when the chicks will begin getting into position for hatching and too much disruption will make it difficult for them to orient properly. Chicks will place themselves with their head at the large end of the egg, where the air cell is, for hatching.
Sourcing hatching eggs
If you’re not planning to use your own eggs for incubation, there are a couple of other options for sourcing hatching eggs. These days you can find almost any kind of hatching eggs you’re looking for online. From bulk order hatcheries to show quality rarities, you can likely find a breeder for the type of poultry you’re looking for who’s willing to ship hatching eggs to you by mail. If you go this route, the seller will most likely tell you to let the eggs settle in a safe place for a few days before beginning to incubate them. This is to allow the yolk and air cell to settle, increasing the viability of the eggs.
Another way to source fertile eggs for hatching is to find someone local to you that has a fertile flock. If you know someone who has a laying flock with a rooster, chances are they have fertile eggs, even if they have never used them for hatching before. A quick search on social media, Craig’s List, or the web can sometimes turn up local farms that have hatching eggs available upon request. Just be sure to reach out to the farm at least a week ahead of when you’d like to pick up your fertile eggs, because the farmer will need to collect the eggs and store them differently than they would eggs that were destined for food use.
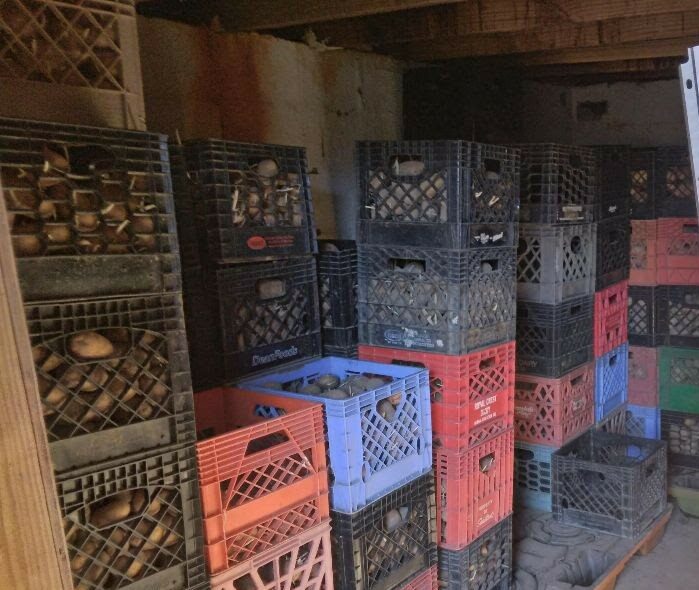
Hatching eggs should not be washed before incubation since there is a natural “bloom” on the shell that protects the egg from bacteria and other potential contamination that you do not want to remove. They should also not be refrigerated. Ideally, eggs collected for hatching should be sorted for proper development (full size, smooth shell) and not be too soiled. Once collected, place hatching eggs with the pointy end down in a clean egg carton and store in a cool (55 degrees F is ideal), not too dry (50-75% humidity is ideal) place for up to two weeks. Fresh eggs (between 1-3 days old) are likely to have the best chance at viability, but naturally it would take a hen 7-10 days to accumulate enough eggs in a nest to trigger the broody/setting response, so even slightly older eggs will still be viable if stored properly. If you won’t be incubating them within the first few days, it’s a good idea to turn them occasionally to encourage the extra-embryonic tissue development described above.
If you are looking for a certain breed of chicken to hatch, it may be worth asking contacts within the farming community for connections. Often times someone knows someone with a certain breed, and even if the service of providing hatching eggs isn’t something that they typically offer, a farmer is happy to collect some fertile eggs and save them for you if requested. You can also always feel free to contact NOFA/Mass, post in our community listserv, or engage with our Facebook groups for advice.
Candling
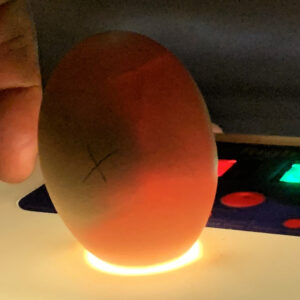
Candling an egg at day 14. You can clearly see the developing embryo in the shaded half of the egg. This is a viable egg.
Another important step in hatching eggs is to “candle” them at least once during the incubation period. The term “candle” means to shine a bright light against the egg being incubated to get a peak into what’s developing (or not) inside. Not all eggs will be viable, even if they were fertile to begin with, so it’s important to identify the non-viable eggs along the way. These days we do not use candles as a light source since they throw a lot of heat and are not a stable stream of light. A flashlight works well, and many modern incubators even come equipped with a candling light.
This is a great visual tutorial on how to candle eggs and what to look for at various stages of development. Basically, you want to start checking for healthy development around day 4 of incubation. Remove any eggs that are visibly not developing (called “yolkers” or “quitters”) and discard them. If left unchecked, non-viable eggs left in the incubator can rot and even explode, contaminating other healthy eggs and ruining your clutch. We typically candle chicken eggs around day 4, day 8 and day 14 to assess progress.
Hatching
The moment you’ve been waiting for…hatching! It’s fun to see the eggs begin to move on their own in the final days before they are “due”. Sometimes you can even hear peeping coming from inside the eggs if you are very quiet.
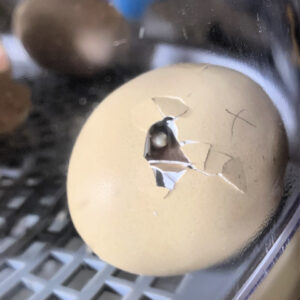
A large pip hole from a hatching chick.
When a chick is ready to escape the egg, they will make a small hole in the egg called a “pip”. Chicks are equipped with an “egg tooth” on their beak to help them crack through the shell and chip away at an initial seamline, called a “zip”, that typically runs horizontally around the circumference of the egg.
Once you see the first pip, you can expect chicks within the day. Sometimes chicks pip as early as day 18 or as late as day 24. But if incubation is done properly, they are typically pretty “on time.” It can take up to 24 hours for the chick to hatch after pipping. During this time, they will be resting, adjusting to breathing, shifting, and getting to work breaking out. It can feel like an eternity waiting for a chick to hatch, but it’s vitally important that you not “help” them escape the egg. Manually removing bits of shell or membrane can cause injury to the chick, including tearing blood vessels that are still important to the premature chick’s survival. It’s also important not to open the incubator during hatching if at all possible. This causes temperature and humidity fluctuations which can be detrimental to this critical moment in the chick’s life.
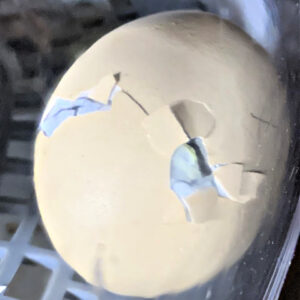
The zip stage of hatching. The chick inside has cracked a seam in the egg so that it will be easier to push open.
We recently hatched a batch of Lavender Orpington chicks in our incubator. You can see a video of one of these chicks in the final moments of breaking out of the egg here. It never gets old seeing new life emerge into the world, and children are especially awed by the experience.
Once your chicks have hatched, allow them to rest, dry off and become aware of their surroundings before moving them to a brooder. Discard any unhatched eggs after day 24.
Next steps: Preparing for brooding
Read part 2 of this series here: Setting Up Your Brooder and Caring for Juvenile Poultry.
Have you hatched chicks at home? Tell us your story or reach out to Christy with questions about your incubating journey at christy@nofamass.org.


